# The journey to NixOS on a MacBook Pro (11,1 aka late 2013)
- published on
I happen to have an old MacBook gathering dust on a shelf. She’s pretty cute, a late 2013 MacBook Pro that I used secondhand for a few years. Now, I’ve recently gotten increasingly aware of the unreliability of platform companies. So following the footsteps of probably every nerd with an old laptop, I thought “Hmm… I could probably turn this into a server and host a bunch of stuff there!”
Now, knowing my track record with hardware and system configuration (disks and networking, oh god), I figured this task would be about 50 times harder than I expected. So, I gave myself a comparatively simpler task of merely booting into NixOS on the system. Bonus points if I can ssh into it with Tailscale. Double bonus points if I can do it with flakes.
WARNING: A lot of the stuff I do doesn’t work. This post is meant as a walkthrough of my process. If it helps someone else bumble their way through to NixOS as well, that’s great. But be aware that you probably shouldn’t follow this post step by step. I will do my best to mark what things did and did not end up working.
# First steps: Searching around and giving it a try
My first step was to do copious amounts of web searching. What are all the relevant documentation pages and possible pitfalls? There’s a section in the NixOS manual about building custom live ISOs with extra drivers, but that seems to use channels rather than flakes which I would prefer. I also found hardware configuration for my model of macbook that adds required nonfree drivers for networking. Finally, I found a handful of blogs, as well as a whole heap of discussion threads that I figured I could read if I ran into issues.
So at this point I had a game plan:
- Build a custom installer with the model-specific extra drivers,
- Get that onto a USB drive,
- Boot from said drive,
- Do all the needed disk management and partitioning, and
- Proceed with the installation.
Things started off smooth. I was able to get a basic flake.nix going with the necessary configuration and started building the ISO. (This ended up being unnecessary.)
{
  description = "my nix server iso";
  inputs.nixpkgs.url = "github:NixOS/nixpkgs/nixos-24.11";
  inputs.nixos-hardware.url = "github:NixOS/nixos-hardware/master";

  outputs = {
    self,
    nixpkgs,
    nixos-hardware,
  }: {
    nixosConfigurations =
      let base = {
        system = "x86_64-linux";
        modules = [
          # hardware requirements
          nixos-hardware.nixosModules.apple-macbook-pro-11-1
          # required for proprietary drivers
          { nixpkgs.config.allowUnfree = true; }
        ];
      }; in {
        iso = nixpkgs.lib.nixosSystem base;
        real = nixpkgs.lib.nixosSystem (
          base // {
            modules = [
              # add modules here if necessary
              {
                services.tailscale.enable = true;
              }
            ];
          }
        );
      };
  };
}
nix build .#nixosConfigurations.iso.config.system.build.isoImage# Overcoming the first hurdle
However, my first hurdle came immediately with cross compilation. My current system runs aarch64-darwin, and my target system is x64_64-linux. Once nix build finished downloaded the necessary sources, it observed this discrepancy and refused to compile. Thankfully, I did find a thread with someone facing the same issue. Which is great, because they shared their solution!
After setting up nix-rosetta-builder in my nix-darwin, I was able to continue building the ISO. Fantastic! With this ISO, I could continue. The next steps were to put that thang on a USB stick. I followed these steps from the NixOS manual:
# find the external disk under the IDENTIFIER tab
$ diskutil list
# unmount
$ diskutil unmountDisk diskX
# use the rdiskX variant instead of diskX to speed the copying
$ sudo dd if=<path-to-image> of=/dev/rdiskX bs=4m
# at this point, ignore the popup about the disk not being readable, and eject
$ diskutil eject /dev/diskX
And voila! I can boot into the installer. I got a little concerned at first, because I tried to run some commands in the terminal and got some SQUASHFS errors, but after rebooting into the installer everything seemed fine.
# Disks and partitions and file systems
Now that I had the live USB working well, I booted back into macOS so that I could do all the partitioning and disk management from a GUI. I also realized that I had a lot of junk on the laptop that I wanted to clean up. Since I was going to have NixOS live on a separate partition from macOS, I figured it would be good to reclaim disk space this way.
After managing to shrink my macOS disk usage down to a “slim” 160GB, I managed to:
- Resize my macOS container partition down via
diskutil apfs resizeContainer /dev/diskMIAU 160GBbecause I couldn’t find a way to use the Disk Utility GUI to create empty space (shoutout this StackExchange user) - Reboot into recovery mode and disable System Integrity Protection because that was also causing issues (thanks GPT fdisk homepage for warning me)
- Boot back into macOS to actually began partitioning.
I used gdisk installed via brew install gptfdisk. Thankfully this worked, since Homebrew is EOL on macOS Big Sur, and the hardware isn’t receiving any updates.
I began:
$ sudo gdisk /dev/disk0GPT fdisk (gdisk) version 1.0.10
Warning: Devices opened with shared lock will not have their
partition table automatically reloaded!
Partition table scan:
MBR: protective
BSD: not present
APM: not present
GPT: present
Found valid GPT with protective MBR; using GPT.
Command (? for help): p
Disk /dev/disk0: 977105060 sectors, 465.9 GiB
Sector size (logical): 512 bytes
Disk identifier (GUID): E63460A7-44D1-40A5-A1CB-BEB6B1761419
Partition table holds up to 128 entries
Main partition table begins at sector 2 and ends at sector 33
First usable sector is 34, last usable sector is 977105026
Partitions will be aligned on 8-sector boundaries
Total free space is 664195393 sectors (316.7 GiB)
Number Start (sector) End (sector) Size Code Name
1 40 409639 200.0 MiB EF00 EFI System Partition
2 409640 312909639 149.0 GiB AF0A Macintosh HDThis looked similar to how this blog sets up their disks, so I continued. I created a root partition, as well as a 16GB swap partition.
Command (? for help): n
Partition number (3-128, default 3):
First sector (34-977105026, default = 312909640) or {+-}size{KMGTP}:
Last sector (312909640-977105026, default = 977105023) or {+-}size{KMGTP}: -16GB
Current type is AF00 (Apple HFS/HFS+)
Hex code or GUID (L to show codes, Enter = AF00): 8300
Changed type of partition to 'Linux filesystem'

Command (? for help): n
Partition number (4-128, default 4):
First sector (34-977105026, default = 943550600) or {+-}size{KMGTP}:
Last sector (943550600-977105026, default = 977105023) or {+-}size{KMGTP}:
Current type is AF00 (Apple HFS/HFS+)
Hex code or GUID (L to show codes, Enter = AF00): 8200
Changed type of partition to 'Linux swap'
I rebooted, and everything looked to be well!
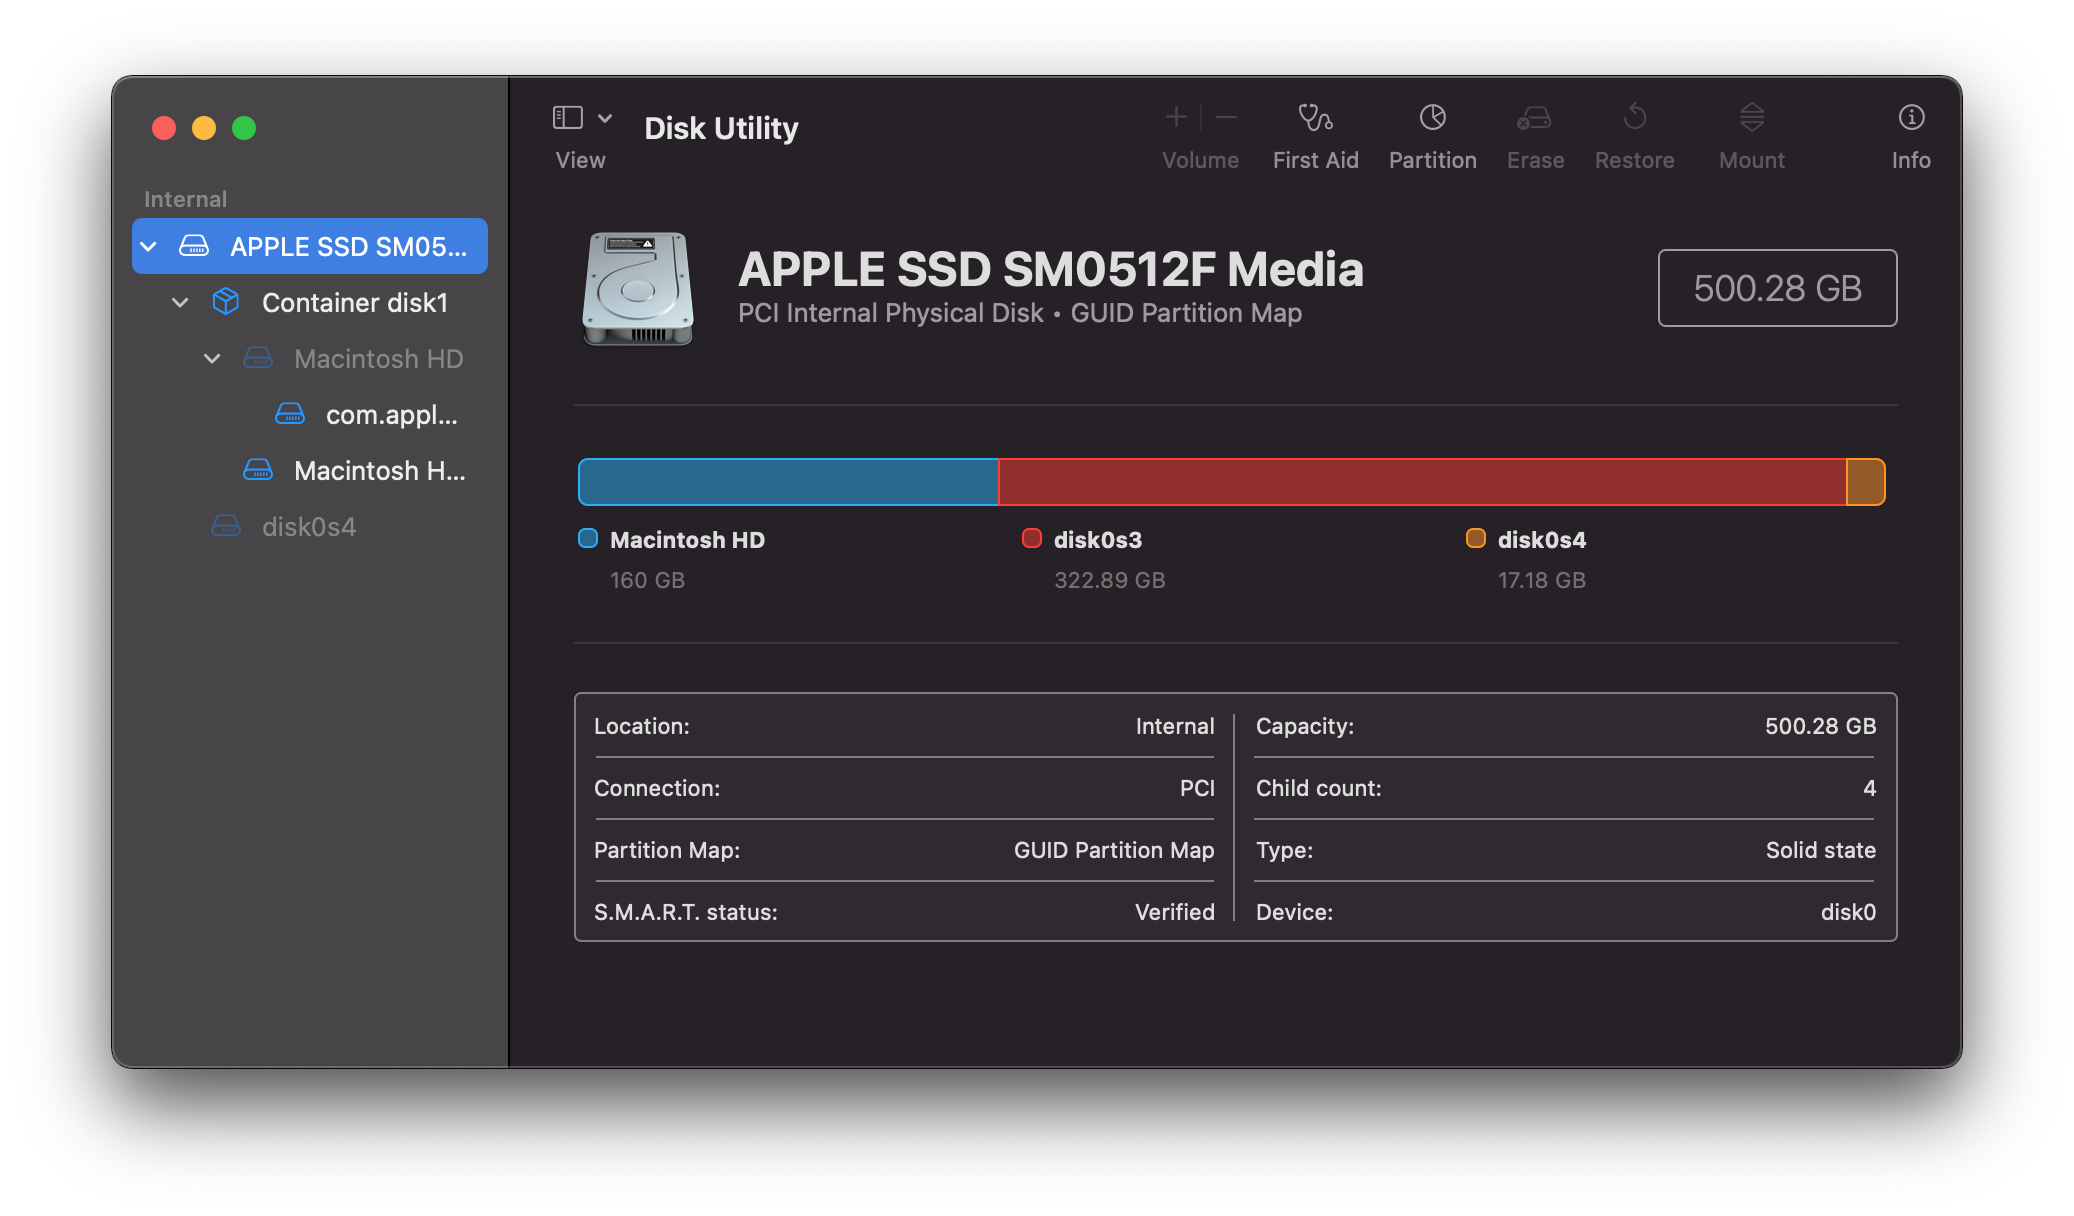
I booted into the installer and formatted the partitions: (note that /dev/sda1 is the EFI boot, /dev/sda2 is macOS, /dev/sda3 is NixOS and /dev/sda4 is swap)
# partition #3 was the big one
# and no I'm not messing with zfs or anything
# I just want to boot for goodness' sake
$ sudo mkfs.ext3 -L nixos /dev/sda3
# partition #4 was the small one
$ sudo mkswap -L swap /dev/sda4
… and don’t forget to mount them too:
$ sudo mount /dev/sda3 /mnt
$ mkdir -p /mnt/boot
$ sudo mount /dev/sda1 /mnt/boot
$ sudo swapon /dev/sda4
Now we can get to the actual installation!
# The actual installation
Okay, one more thing first: Connecting to WiFi.
$ ip link # get the interface name (wlp3s0 for me)
$ wpa_passphrase "funny network name" "password here" | sudo wpa_supplicant -B -i wlp3s0 -c /dev/stdin
# note: this needs a pipe, it won't work using <(wpa_passphrase ...)
# this is due to dropped file descriptors. don't ask me how long that took to figure out
$ ping olivialta.cc -c 1
# should get a successful packet here!
And we’re golden! I then tried to nixos-install, but… kept getting crypting issues relating to flakes not being enabled? (And --extra-experimental-features not being accepted?)
# Back to square 1.5-ish
Yeah, so most of what I had done up to this point didn’t end up being useful. After hitting the issues that seemingly very few people on the internet had had, I took a break and did something entirely different. (I played through Fez.) This turned out to be quite helpful, because I thought of an alternate way of achieving my goals. I’m sure I would have been able to wrangle the original process, but my new way seemed to be much simpler.
The main reason I had tried to use a custom live ISO is because I needed extra wifi drivers. According to the nixos-hardware repository, a hardware scan wouldn’t automatically detect it. Hence, I would need a custom version of the installer with the modules baked in.
However, this assumption turned out to be false. See, I had previously discarded ethernet connectivity due to my Macbook Pro not having a port for that. However, rummaging through my cables-and-adapters box I found a thunderbolt->ethernet adapter. I was then able to wire up my laptop to my router with a cat6 cable. And the networking works perfectly!
This immensely simplified the rest of the installation process. Frankly everything else was a breeze from that point on. I was able to simply stick a graphical NixOS installer onto my USB stick and install from there. During the graphical installation, I selected “replace existing partition”, since I had already gotten my NixOS root partition (manually) set up previously. I realized however that this did not enable swap, so I had to later manually add swapDevices = [{device = "...";}]; to my configuration (pointing to the 16GB swap partition I set up earlier). I opted to not use a DE, since this laptop had dreams of becoming a little server. Afterwards, I wrapped the pregenerated configuration.nix into a flake, added nixos-hardware.nixosModules.apple-macbook-pro-11-1 as another module, set up the Tailscale and SSH services, initialized some git SSH keys, and at last everything is working super well!
I have my current server configuration on GitHub. It is fairly minimal for now (still missing some power management/sleep configuration so I can run her with the lid down), and I will certainly refactor it away (perhaps merging some bits with my nix-darwin configuration?). But it works, and I’m happy with the learning process that came along the way.